Badge #10: Agate Circus
Danger! Danger!
If you've missed any events you would like to pick up before, now is the time to do so! Whilst the area past the checkpoint does have a lot of Pokémon selection, there is still some very useful Pokémon and items that are only available in Reborn City and its surroundings.
If you've not been keeping up with your Pokédex, now is the time to catch things. A lot of things. Put something with the Magnetic Lure and Glare in your front slot and start catching things. You will thank yourself when you have such a large variety of different species to pick from!
Here's a small list of things you might want to do before leaving:
- Stock up on EXP Candy Ls from the pinata at the Grand Hall. You can get a full stack of these in about 5 minutes if you hold down text skip and run in full speed.
- Buy every single TM you can. See the TM link in the navbar for more information about where to get these.
- Catch a Fletchling from Beryl Cemetery. Gale Wings Talonflame can act as an emergency check to some of the upcoming gyms.
- Catch a Sandile from Tanzman Mountain. As said before, Moxie Krookodile is one of the best Pokémon in the game with an excellent typing and an easy way to snowball.
- Teach any tutor moves you need onto your Pokémon from the school and 7th Street tutors.
- Pick up anything you might need from the Obsidia Department Store. Especially important are the type gems, as they might turn the tide of a battle.
There are four gyms standing between you and returning here, and three of those four are pretty fucking hard. There's also a fairly lengthy gauntlet to fight through! You really don't want to be unprepared!
Once you're ready, talk to Cain at the Agate Checkpoint. As soon as you pass through the back door, you're locked out of Reborn City until you get Fly again, so be absolutely sure you want to do this!
Agate Circus
After a brief-ish cutscene, you'll be teleported into Agate Circus. If you try to go back to Agate City, you'll find the path blocked by guards. (If you try and deliberately wipe out to get teleported back to a Pokémon Centre, you'll respawn here instead. Nice try.)
In the true spirit of Pokémon Reborn, there's a few clowns who are willing to battle you here (thanks?) so clear them out before doing anything else (lest you get surprised after returning from Route 2 and get wiped). Near the PC/healing machine is a vendor that sells EXP Candies, in case you somehow run out, and at the very bottom right is the bootleg Move Relearner (ah, who needs Reborn City anyway). Above him is a vendor that finally sells Ultra Balls and some really good TMs. Buy him out. You can find pairs of Tandemaus walking around; interact with them to, uh, catch them? I guess?
There isn't much else to do here; the Circus is blocked off by the crowd and the path to Route 2 is blocked off by a line. At the top left of the circus you'll find a small crowd gathered around the Ringmaster. Talk to her, and then talk to the conspiciously coloured man next to the High Striker. You can also use the High Striker to randomly win a Clefairy if you hit POWERFUL or TM87 Swagger if you hit "OVER 9000!".
Talk to Samson again to get access to the Circus, and then go into the back room of the circus on the right to find Ayaya sleeping. Interact with her for a long cutscene, including how the sleeping spell over Agate is Team Meteor's fault (wow, really?). Your next destination is at the end of Route 2. (You can interact with Cain/Ayaya again quickly for a bonus relationship point.)
Route 2
The path to Route 2 is now cleared, so make your way to the building at the bottom left of the outside of the Circus. You can also get another sticker in the Route 2 exit. In the lower room, you can talk to the NPCs for information on how the Route 2 puzzle works...
Welcome to Route 2! This is one of the four numbered routes in the game and the second hardest to navigate (after Route 4). Whilst the gimmick of Route 1 was ledges, the gimmick of Route 2 is a movable jumping puzzle, combining the two best parts of this game!
The goal here is to make it to the Fiore Mansion on the other side of Route 2, but you're going to need to build a path all the way over there first. It's a more intimidating puzzle than it looks.
Route 2 Puzzle Solution - Upper Half
This puzzle looks a lot scarier than it actually is. First, we'll do the top half of the puzzle that leads to Ametrine Mountain. Jump across the rocks here to make it to the upper half of the route.
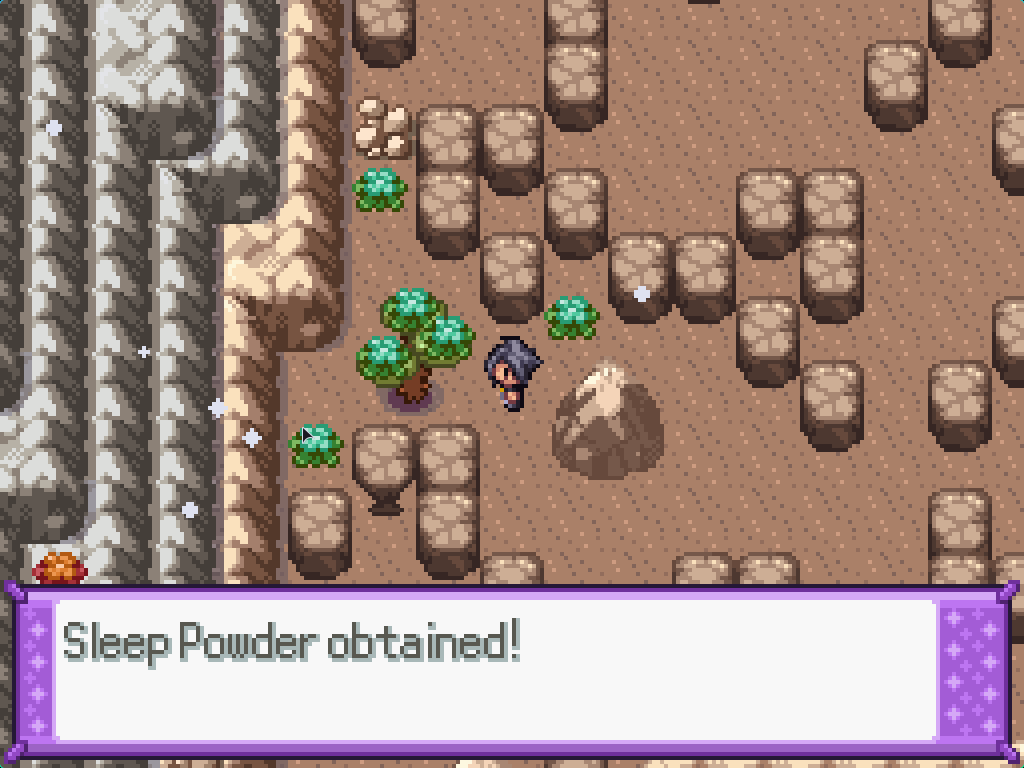
Activate this tree to get the Sleep Powder. A little bit further above is a Crustle nest; activate it to spawn one and use the Sleep Powder to make it go to sleep.
Push the Crustle into the hole on the right side of the route. Make sure not to accidentally push it into a corner; if you do, find the orange tree to collect some Rage Powder and use it on the Crustle to wake it up. Defeat it, and you can spawn another one. Then, go back to the green tree and collect some more Sleep Powder.

To make it onto the upper area, solve the jumping puzzle like so. Do not jump onto the wobbly rock (the one with a thinner base), as it'll ruin your Sleep Powder and you'll have to go back and get some more.

Push the Crustle down into this hole. The top-down view makes it a bit difficult to see if you have the right clearance, so be careful not to get yourself stuck again. I suggest you turn off speedup for this. Return back to the tree to get some more Sleep Powder.
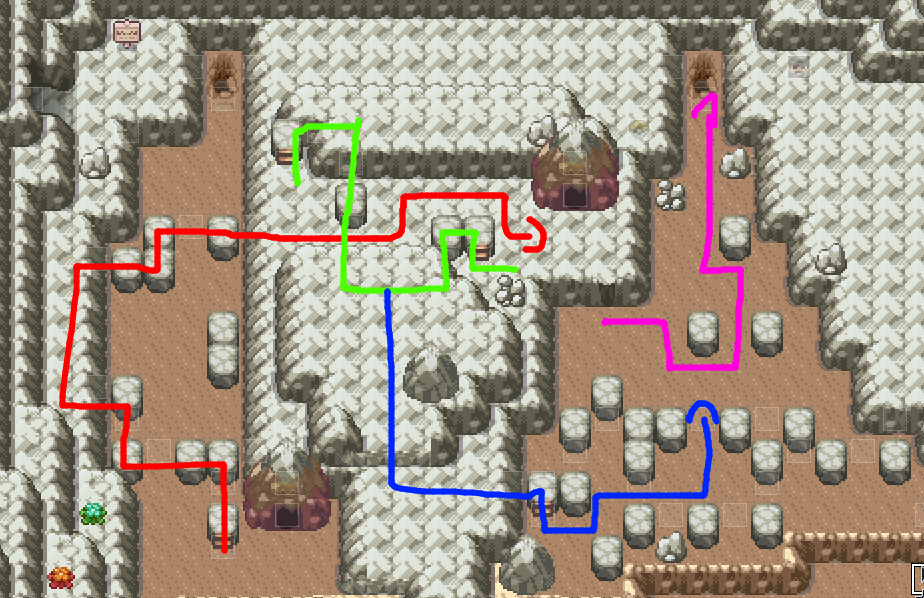
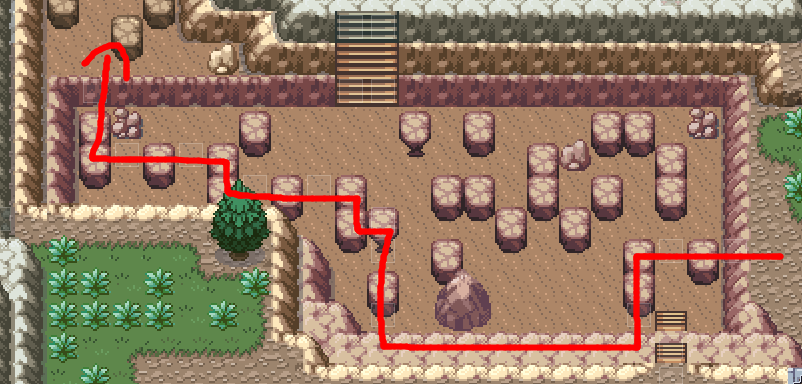
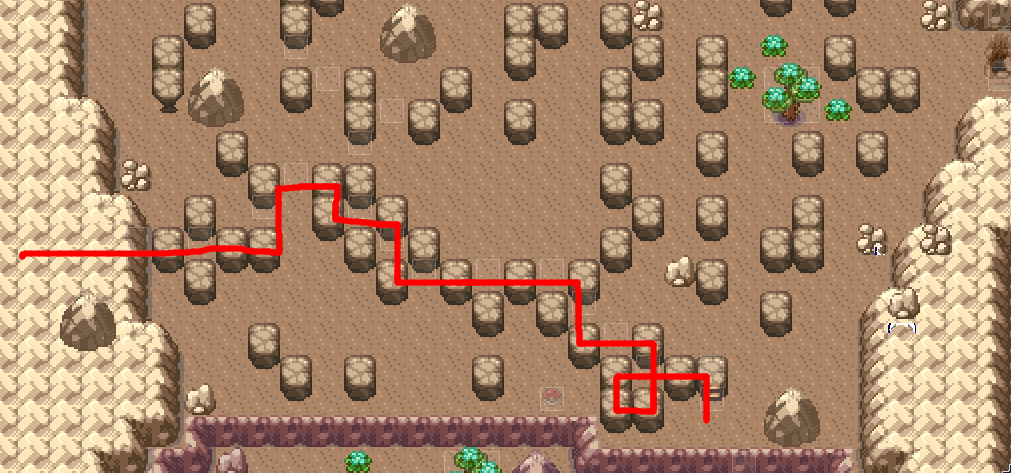
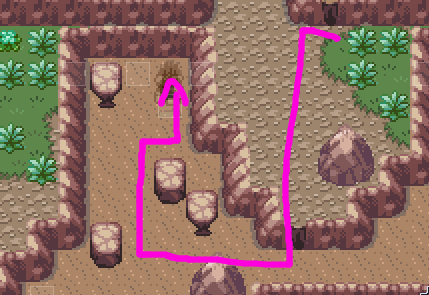
This one feels specifically designed to screw you. Follow the red arrow to make it to the next nest, and activate the Crustle. In order to get it down the cliff, push it back towards the jumping blocks until it blocks your path back, then follow the green line to push it downwards one square. Follow the green line in the opposite direction to push it across and down the cliff. Finally, follow the pink line to push the Crustle into the hole. (I drew it wrong, but the long gap in the red arrow has you jump to the left).
Now, you can jump across the Crustle to make it to Ametrine Mountain 2F, picking up TM58 Sky Drop on the way. Sadly, you can't actually do anything here without Surf, so let's head back to the start and do the lower half puzzle.
Route 2 Puzzle Solution - Lower Half
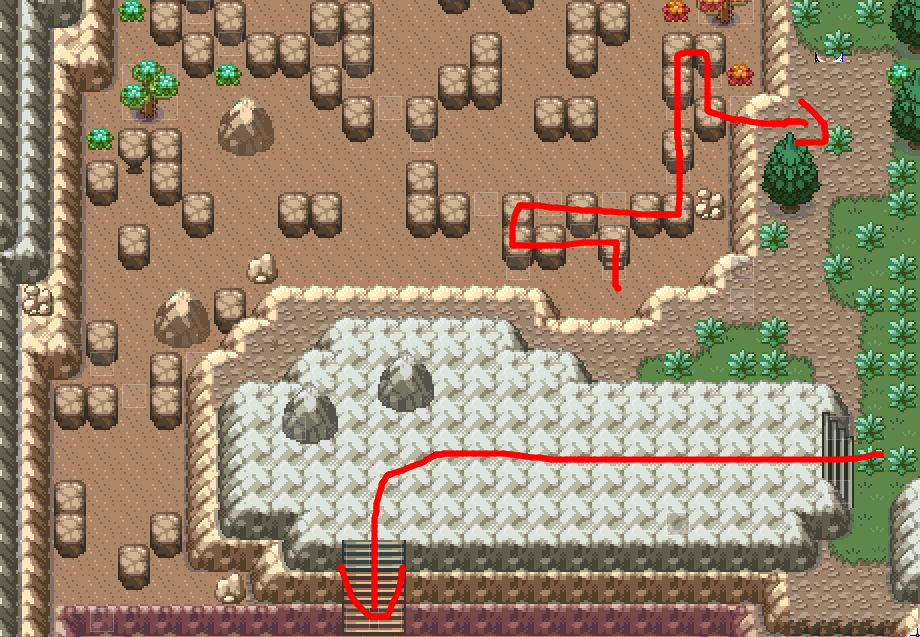
First, we need to actually get to the lower part of Route 2. Follow the jumping puzzle up here (see previous solution for details) and go up then down the stairs here. Activate the green pylon on the side of the gate to open a shortcut between the Circus exit and the lower half.
Let's start by opening up the path to the right. There's currently an empty Crustle hole that you need to fill up to continue. Go down the left path and solve the jumping puzzle to get access to this levels' floor.
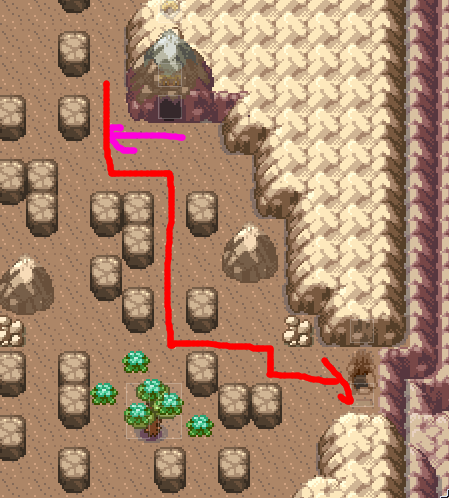
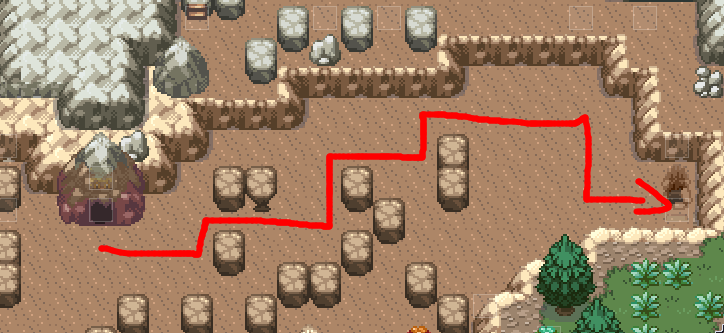
Get Sleep Powder from the tree nearby, and then activate the Crustle directly above. This one requires a bit of manuevering to get it into the hole; follow the short blue arrow and then the long red arrow. Once that's done, walk back through the puzzle but don't walk down to the Crustle you just placed; you still need to put some more down. Instead, walk all the way down on the left side and onto the floor of the lower section.
Activate the Crustle and move it down to the cliff as shown in the image (leave it there for now).
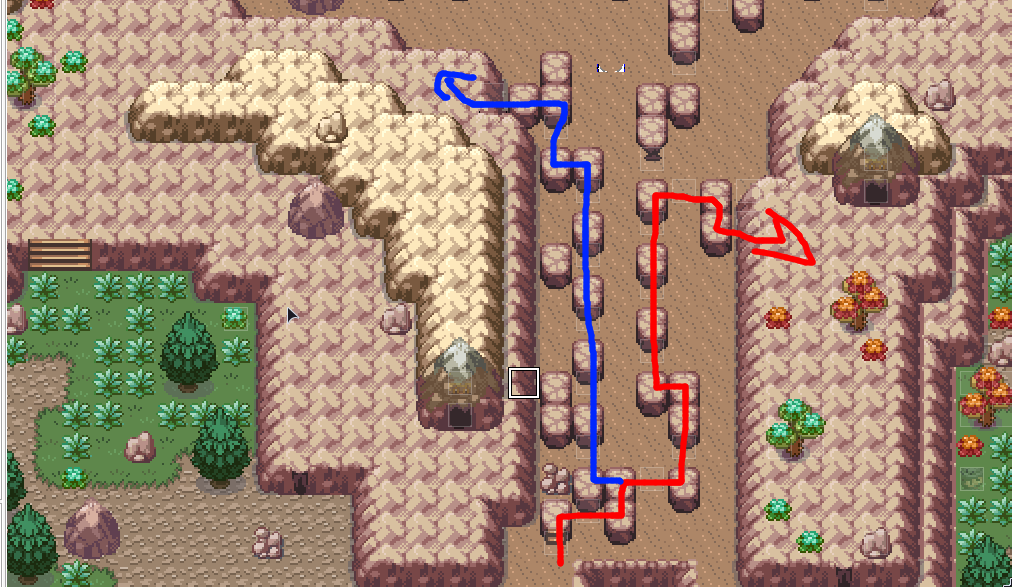
Follow the first blue line to find the left-most Crustle, then activate it and push it down into the hole. Then follow the second red line to find the right-most Crustle, activate it and push it down into the hole.
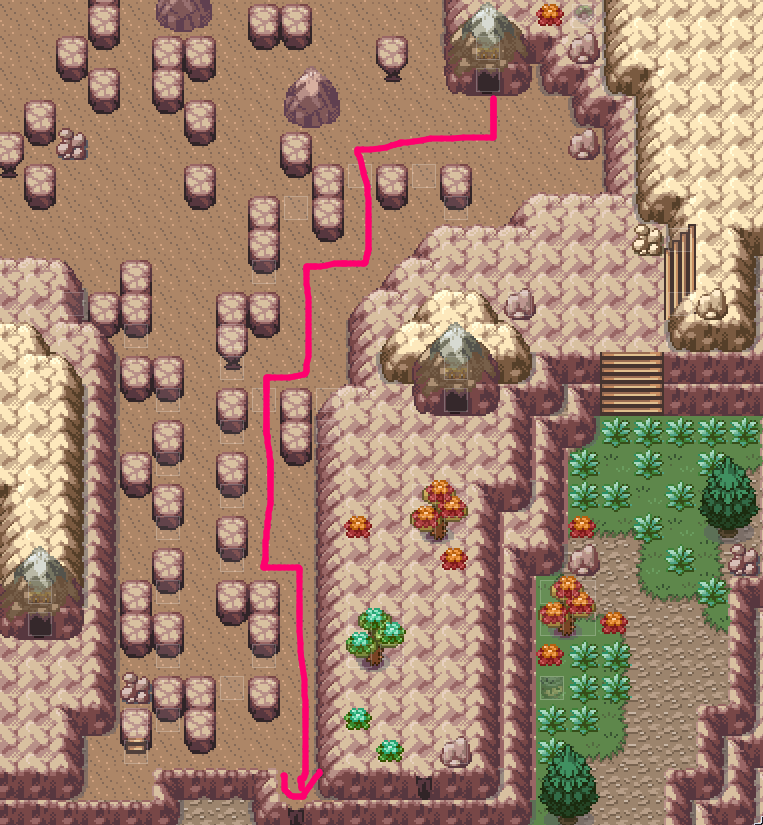
Finally, loop all the way around the right side of Route 2 again to find the middle Crustle that you abandoned on the cliffside. Push it into the hole to finally clear the way to the Celestine Cascade.
The rest of the path through the Celestine Cascade is blocked off by a body of water which you can't get through without Surf. Rats! Travel upwards to the Fiore Mansion where you will find Amaria (remember? The loveable gym leader from all the way back in Blacksteam Factory? Do you remember her?). Talk to her, go upstairs, etc, for a bunch of cutscenes.
You get the battle pass required to fight Samson from Titania (why do gym leaders have it?), so let's go back to the circus and fight him.
Fightin Time
There's two fights here between you and your tenth badge, and they're both in the Big Top. Walk through the front door to get forced into a fight with the Ringmaster.
This fight, the next fight, and the 13th Gym fight all take place on the Big Top field, the most incredibly fucking irritating field in the game. A lot of otherwise useful moves get converted into striker moves, which have some extra randomness applied: sometimes they do even more damage, or sometimes they do piddly damage. The range is mostly "extra damage" so this usually turns a lot of these moves into one-hit kills.
And, of course, I've done you a favour by making this pair of fights even harder by bumping them up to the level cap and adding a sixth Pokémon to the Ringleader's team! You're very welcome. I promise that it is, with some luck and good play, possible to beat both of these on no-items Set mode because I had to do it to beat this fucking gym myself.
This fight and the next fight take place on the Big Top field, the second stupidest field in the game. Amongst other effects, this converts certain types of moves into striker moves, which get random additional damage. Great! Anyway, first you have to kill the Ringmaster. She's honestly even harder than the gym. Some tips:
- Basically every single Pokémon here is built to fit with the stupid attack damage gimmick. I could change it. I won't change it.
- Her Donphan is the biggest pain in existence. It knows Earthquake, and it knows Ice Shard, and it knows Heavy Slam; two of these can randomly roll higher damage and one-hit kill you. Also the field is biased towards rolling higher when you have a higher attack... and guess what the Synthetic Seed does?
- Using a Luxray is inherently kind of throwing, but now that it's a Fairy type in this mod you can dispatch it with any Poison move before it has a chance to hit you with a Guts-boosted roll.
- Did you catch an Talonflame? Gale Wings + Acrobatics can act as an emergency check if you switch it in at the right time.
- If you break Blaziken's Focus Sash, be prepared for it to just annihilate you with boosted Acrobatics! Try and get it with a multi-hit move; or even better, pack a priority move like Sucker Punch or Ice Shard to remove that 1 HP.
- Perhaps the worst type to use here is a Grass type, which will die to basically everything. Second worst is a Ground type, which will die to Solar Beam, or Sparkling Aria, or just a random fuck you roll. You probably want a Water type or two.
- Just reset a bunch until you get some good rolls, really.
Ringmaster Alistasia
| Sprite | Name | Level | Ability | Held Item | Moves | EVs |
|---|---|---|---|---|---|---|
|
|
Pyroar | 70 | Rivalry | Power Herb |
|
4/0/0/252/0/252 |
|
|
Luxray | 70 | Guts | Choice Scarf |
|
128/252/4/128/0/0 |
|
|
Donphan | 70 | Sturdy | Synthetic Seed |
|
252/252/4/0/0/0 |
|
|
Primarina | 70 | Torrent | Leftovers |
|
252/0/4/252/0/0 |
|
|
Blaziken | 70 | Blaze | Focus Sash |
|
0/252/0/0/4/252 |
|
|
Copperajah | 70 | Sheer Force | Normal Gem |
|
252/252/4/0/0/0 |
After beating her and her cheesy Pokémon into a pulp, go into the side room to progress. Talk to everyone but Samson for some free relationship points, then talk to Samson to start the gym battle. As usual, some tips, again:
- Hey. You know how Donphan was really funny in the last one. What if I gave one to Samson too.
- Talonflame. Use the Talonflame. It sounds counter-intuitive, but Flying Gem Acrobatics can be enough to score a one-hit on something, and then you get the standard Acrobatics boost on every move after that.
- At least there's no lead Tauros here... like I had to deal with before...
- The worst, the absolute worst one here, is that fucking Hawlucha. Unburden means it will go REALLY fast immediately, it's decently bulky, Acrobatics eviscerates everything standing in its way, and Roost means it can heal itself! Seriously, I really hope you caught a Talonflame.
- Swords Dance, Dragons Dance, and Quiver Dance all give even MORE stats. Use this to your advantage!
- This is perhaps the most important battle to have something that can do Poison, because it can help force forwards progress. Just be careful of his Donphan.
- I actually beat him fairly handily for the first time... ever, when updating this walkthrough again. If I can do it, you can do it too.
Strongman Samson
| Sprite | Name | Level | Ability | Held Item | Moves | EVs |
|---|---|---|---|---|---|---|
|
|
Hariyama | 70 | Guts | Rocky Helmet |
|
0/252/4/0/0/252 |
|
|
Mienshao | 70 | Regenerator | Life Orb |
|
0/252/0/0/4/252 |
|
|
Donphan | 70 | Sturdy | Synthetic Seed |
|
252/252/4/0/0/0 |
|
|
Hawlucha | 70 | Unburden | Synthetic Seed |
|
4/252/0/0/0/252 |
|
|
Blaziken | 70 | Reckless | Synthetic Seed |
|
4/252/0/0/0/252 |
|
|
Conkeldurr | 71 | Sheer Force | Synthetic Seed |
|
0/252/252/0/0/4 |
No level bump this time, but you can now use Surf. Unfortunately, you don't have Surf. Back to the Fiore Mansion to get it.